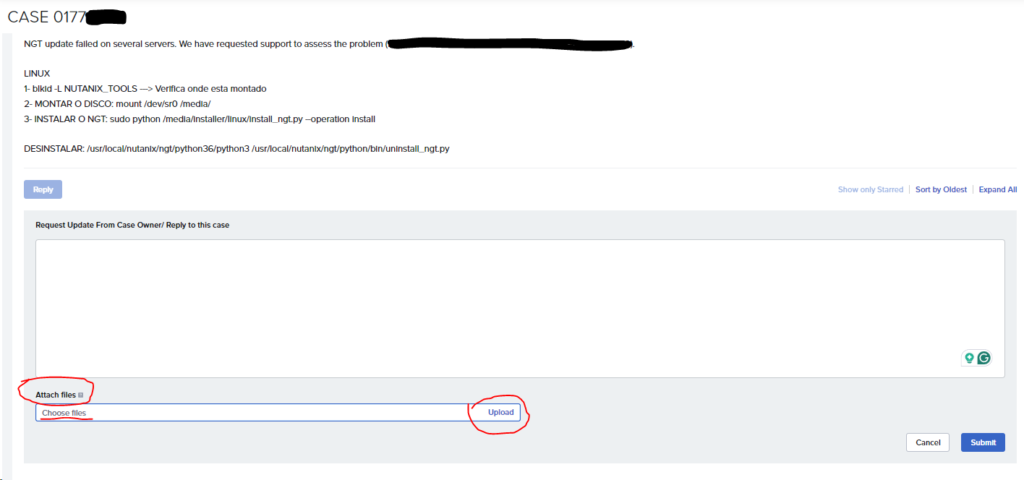
Uploading the Log Files by using the Customer Portal
To upload the log files using the Customer Portal, do the following:
- Log into the Nutaix Portal using your credentials and go to Dashboard > View Cases. A list of all the cases that you have access to is displayed.
- Find the case number corresponding to the one you need to upload the files to, click on the case subject, then click on the Reply button in the top left corner of the page, and Attach Files field. Click Upload and browse to select the files that you want to upload.

- Click OK, enter a comment or description of the uploaded file, and then click Submit.
- Contact Nutanix Support with the case details and uploaded files.
Uploading the Log Files to the Nutanix FTP Server using FTP command
Follow the steps below to upload the files using the FTP command to the Nutanix FTP server.
- If you have direct access to the Nutanix FTP server from the host where you created the archive file, upload the file directly. If not, you must first copy the file to your local desktop (by using SCP, WinSCP, or SMB file share browsing). Then, from your local desktop, use the command line or an FTP client such as WinSCP or FileZilla to upload the file. If using a command-line interface, you can connect to the FTP server by using the following command.
root@linux# ftp ftp.nutanix.com
The following are the details of the Nutanix FTP server.
- Server: ftp.nutanix.com
- Username: inbound
- Password: nutanix/4u
After you have successfully connected to the FTP server, do the following:
Switch to FTP passive mode, binary uploads. This is mandatory and many FTP clients do not switch to this default mode
ftp> bin
ftp> quote pasv
Create a new subdirectory for your case, and then move into that subdirectory
ftp> mkdir <case_number>
ftp> cd <case_number>
Put the file onto the server.
ftp> put <filename>
Replace filename; with the name of the file you created.
Example:
root@linux# ftp ftp.nutanix.com
Connected to ftp.nutanix.com.
220 Welcome to Nutanix FTP service.
Name (ftp.nutanix.com): inbound
331 Please specify the password.
Password:
230 Login successful.
ftp> bin
200 Switching to Binary mode.
ftp> quote pasv
227 Entering Passive Mode (192,146,155,27,157,206).
ftp> mkdir 1234
257 “1234” : The directory was successfully created
ftp> cd 1234
250 OK. Current directory is /inbound/1234
ftp> put case_1234_logs.tgz
local: case_1234_logs.tgz remote: case_1234_logs.tgz
200 PORT command successful. Consider using PASV.
150 Ok to send data.
[file transfers]
226 Transfer complete.
2. Contact Nutanix Support with the case details and uploaded files.
For SFTP:
root@linux# sftp inbound@ftp.nutanix.com
inbound@ftp.nutanix.com’s password:
Connected to ftp.nutanix.com.
sftp> mkdir 1243
sftp> cd 1234
sftp> put case_1234_logs.tgz
Uploading case_1234_logs.tgz to /inbound/1243/case_1234_logs.tgz
case_1234_logs.tgz 100% 30 0.2KB/s 00:00
sftp> bye

